Wednesday, November 27, 2013

Pinterest Save - Away In A Manger Ornament

Gosh. I thought that I was going to fail at the last moment, and not continue with my one Christmas Decoration a day challenge that I set myself. But thankfully Pinterest saved me with this quick little ornament

 
This ornament was based on a post from "Tales of a Trophy Wife" which I saw on Pinterest.  Lucky I had everything I needed to make these sweet ornaments.
 
As you can see from the above photo I tried three different versions of the wreath.  The first wrapped in hessian on a bed of wood filling, with a wire hanger.
 
 
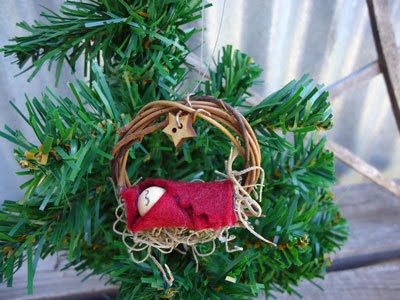
The second, wrapped in felt on a bed of Spanish moss with a fishing line hanger.
 
 
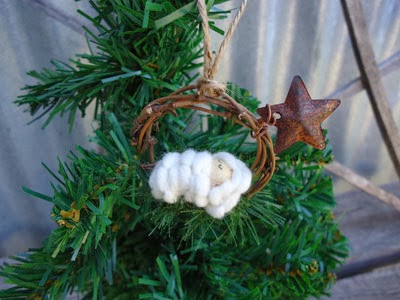
The third and final one I wrapped the baby in wool on a greenery bed, and then placed a larger rusty star on the outside of the wreath.  This one has a jute hanger.
 
 
Three little ornaments, that took only about 5 minutes each to make.  Thank you Pinterest!


I do have excuses why I was running late with this post though, do you want to hear?
Firstly my computer was dismantled so that I could have new windows installed yesterday - so I had to reconnect it all AND then today I have spend the entire day packing up online orders from the store.  It was a huge day for me, and I still have to go and water the garden as the temperature reached 36 degrees today.  Just the beginning of the summer heat.
 
Until tomorrow, take care
Judy

Tuesday, November 26, 2013

Paper Christmas Trees

My sister Sue and I played with some really old vintage newspapers today - we each created three paper Christmas trees.

 
The first tree, from the left, was a paper ribbon tree.  We based this on the ribbon Christmas tree hanging ornament.  A wooden skewer was used for the upright which we then glued into a bark chip, stolen from the garden.  I placed a chipboard star on the top of mine, while Sue used a rusty star button, threaded through with jute.
 
 
Next, came the layered paper Christmas tree.  This one gave us the most trouble.  We cut out five different sized circles.  Folded them in half four times, and then concertina the folds ... OK on the large circle but by the time you got to the tiny circle (approx. 4cm) it was a little difficult. They are then threaded onto a wooden skewer in descending order.  Sue used a star spray on the top, while I used a angel bottle cap decoration


The final paper tree was a 3D one which we used to make when we were children.  I think we used heavier cardstock for these trees, but today we were playing with newspaper.  Cut out three paper trees, the same size.  Fold two in half, then layer them, one folded on the bottom, making sure you even up the sides, the full tree on top, and then the other folded on top again, but on the opposite side from the bottom folded tree ... I hope this makes sense, as I did not take any photos of the actual processes.  (if you need photos, just leave a comment)
 
Once you have the three layers together, carefully take them across to your sewing machine and sew down the centre, ensuring all pieces are stitched.  Open out and there is your tree.


You could play with the sizing of each of these trees to make a great mantle display.. I like the idea of adding some rusty miniatures around the trees.
Still 4 days to go on my challenge, what next?
Judy

Monday, November 25, 2013

Nativity Hanging Tags

In my last post, I had a idea for a pack of Nativity themed buttons.  Add to the pack of buttons a packet of different sized paper tags and an easy project is under way - both the buttons and tags are available in store

 
                                                SB7473                                     DD1201-42
 
Just remove the shanks off the back of the buttons, I recommend this tool - BCG100 - Precision Diagonal Craft Cutter - they cut the shank off, flush to the back of the button.  They are also spring loaded, so there is no stress on your hands.
 
 
All you need to do now, is glue the buttons onto the paper tags.  Easy.  I joined two tags together for this hanger.  The small split rings used for jewellery were too small, so I used a small keyring to join the two.  They swing nicely on the tree.  If I was making another set of these tags, I would put Joseph on the other side of Mary, so that the hook is not on the inside .. funny how you see these little mistakes AFTER you have finished!

 
I used the lamb and angel buttons on the next tags, and also included a star/snowflake button, which I think works quite well
 
 
That just left the little donkey button - all on his own
 
 
Using any buttons, this would be a very easy project to share with your children.  The tags can then be hung on the tree or used to decorate your gifts.  Lots of fun
 
 
Until next time
 
Judy

Sunday, November 24, 2013

I'm in LUV .....

With this little fellow -

 
Remember the curtain rings that I purchased for 50 cents  - I have made three more little wreaths, and this birdie is my absolute favourite. 
For this birdie wreath, I just wound green glitter chenille sticks around the curtain ring and then hot glued the little birdie inside
 
The next variation used the same principle however I used just the common green chenille sticks (no glitter) and then glued a snowman button to the wreath.  A white chiffon ribbon was threaded through the loop at the top for the hanger.
 
 
Finally, for the third wreath, I wrapped the outside with white/cream wool and then glued on a bright candy  cane button - threaded through some red/white bakers twine for the hanger.
 
 
With the many Christmas buttons available (especially in my online store, check out the link to see just how many different packs of buttons are available, and this does not include the snowmen buttons), the possibilities are endless.
 
The three wreaths all together so you can see the difference.  They do not look quite the same, when they are lying flat!
 
 
I could not resist showing you this next photo, it was the first one I took of the little birdie wreath, with my garden in the background... he nearly got lost in all the greenery.
 
 
After playing with my buttons and curtain rings, it has given me an idea for another project using this pack of buttons.  It is a cute pack of buttons from Dress It Up, reflecting the nativity scene which I have just added to the store.
 
 
Wish me luck
Judy

Saturday, November 23, 2013

Snowmen Peg Magnets

I am really on a roll with my little Christmas decorations.  Today I hand painted some wooden pegs - just the cheap spring loaded variety.

After a couple of coats of white paint, I drew the snowman faces on with permanent markers, yes I could have painted the faces on, but this was much easier


I then dressed them - rusty buttons, scarves, hats, anything I could find
Check out the tiny weeny buttons on this one!  I burnt my fingers trying to hot glue them down the front.
 
 
I then cut a little round magnet in half (so that it would not show from the front) and glued it to the back of each snowman
 
 
Now you can place them on the fridge or any other metal surface.  I tried placing them on my new rustic metal Christmas tree, however I could not fit the entire tree in the photo.
 
Hope you can get the idea from the following couple of photos.


I just realised when I was posting these photos, that I had forgotten to give the snowmen some blush on their cheeks ... I must go and do that immediately before I forget.
 
I am setting myself a challenge to try and make a small decoration everyday until the end of November ... I hope I succeed.
 
Take care
Judy

Friday, November 22, 2013

Three More Button Tree Ornaments

As I had the buttons out yesterday to make the button ornament tags, I decided to make some more button tree hanging ornaments using different coloured buttons.

 
I changed the trunk style, instead of using brown buttons, I used:
 
1.  a small wooden spool
 
 
2.  a gold jingle bell
 
 
3.  a small silver liberty bell
 
 
This next photo shows the liberty bell base better
 
 
Each tree ended up a different size, and this just depends on the number of buttons you use - I really like the variety. 
 
The only difficulty is finding the right piece to place on top of the tree, the star beads work well although I would have like to have had something different on each.  I had many star and angel buttons, but I could not attach them to the top securely.  I had different coloured stars, so that ensured they are a little different from each other.
 
I have to warn you once you start making these little button trees, they are addicting, I loved making them
 
Because I had not set up a tree, I was having a problem trying to take photos of my new ornaments, Today I grabbed a small branch from the yard, and put it in a rusty bucket - just so that I can take these photos ... what do you think?  Nice and rustic!
 
 
I hope you have started making your Christmas tree decorations for this year?
 
Judy


Thursday, November 21, 2013

Button Ornament Tags

Another easy Christmas tag for the children to make are these Button Ornament tags

 
Go through your button jar and find some cute flat buttons.  Place them on your tag in a pleasing position and then draw a line down to the button placement.  Remove your button(s) for a moment and hand draw a little ornament hanging loop, you can just see this above the button placement.  Now glue your button on, that's it!
 
I did colour in the ring reinforcement on my shipping tag as it was "white" and looked out of place,  I just used a black marker to colour it.
 
 
I am going to use these tags on my co-workers Christmas gifts this year.  I think they are even suitable for the men's' gifts.
 
 
I think I will make some more button trees while I have the buttons out.
Did I mention I LOVE BUTTONS!
 
Judy

Wednesday, November 20, 2013

Snowman Tags

It is time to think of Christmas projects that the children can make.  I saw this idea on Pinterest and thought it may be a good start - Snowman Tags


All you need for the snowman are three different sized white pom poms, a couple of small twigs from the garden and something for his scarf.  I used a piece of bakers twine.  I placed my snowman on a shipping tag, however you could just cut out a tag shape from cardboard.  I think corrugated cardboard would look fab.

NO instructions are required, just follow the photo .. it is that easy

I sprinkled a little mica flakes on the bottom of the next snowman tag, to give the illusion of snow and used a small piece of grapevine twig for his hat.


I think the children will like making these and they can decorate them as they like.  Maybe glue some cloves down the front for buttons, or make a nose etc.  This is just the basic idea and can be enhanced in many different ways.


Till next time
Judy

Tuesday, November 19, 2013

Curtain Ring Wreaths

These little Christmas wreaths were made from curtain rings. 

 
I picked up a pack of curtain rings from the second hand store for only fifty cents
 
 
The size and colour were ideal to turn them into little wreaths.  I just wrapped some strips of fabric around them.  You can now decorate them any way you like, add ribbon, bells etc
 
 
These will look great on my Christmas tree.  Any suggestions of what I can do with the rest of the curtain rings?
 
Judy
 

Monday, November 18, 2013

Chenille Candy Canes

Do you want a easy Christmas project to do with your children?  This project would be ideal - Chenille Candy Canes.

 
All you need to do it thread alternative red and white pony beads onto a chenille stick (pipe cleaner) and make the hook at the top by bending gently.  Just ensure you double up each end, so that the beads do not slide off.  It is that simple!


I have the pony beads in store - for only fifty cents ($0.50) for a pack of 100 - so a very inexpensive project to make and it also only uses 1/2 chenille stick for each candy cane.
 
Use these candy canes on your Christmas tree, just loop them over the branches, or as a decoration on your gifts. 
 
Judy

Sunday, November 17, 2013

Button Tree

I have only made one of these button trees (so far), but I want to make more - they were so easy, and look fantastic.  I certainly should have plenty of buttons to make more ...

 
All you require to make these are brown buttons (for tree trunk) and then a number of green buttons in diminishing sizes for the actual tree.  I used a star pony bead for the decoration on top.
 
I followed the basic instructions from this site Modern Minerals however I used jewellery wire for threading the buttons on, this made it very simple and was easy to thread through, and also gave a lovely sturdy hook for hanging.


I wonder what they would look like with different coloured buttons, worth a try?
 
Judy

Saturday, November 16, 2013

Ribbon Tree

I know I have been remiss in updating my blog lately, however I have been spending all my free time in the garden.  It is a lovely time of year to renew garden beads, cut back overgrown shrubs etc before the hot summer days.

I have a number of small Christmas Tree decorations to show you, the first is these cute little ribbon trees.

 
I first saw these on Pinterest, and then I found a site which gave a tutorial with all the measurements.
See link here for Sunshine Yellow blog.
 
One word of advice if you are making these, is to try and use double-sided ribbon.  Because of the way that they are folded, you see the reverse side ... notice my white ribbon tree.  This was the first one I made and thought it would very cute with the green xmas trees on the ribbon, however on one side of the tree the pretty little trees are on the inside!
 
 
The plain green one is much better
 
 
But my favourite is the red one - I used the pony beads on this one.
 
 
Nice and bright.  I will have to get my small Christmas tree setup, so that I can photograph them actually on a tree, I am sure they would look much better, than just lying flat on the table.
 
Are you making handmade decorations this Christmas?
 
Judy